
Using .NET 6 as the head for headless sites in Sitecore XM Cloud
UPDATE 2022-11-16: The git repo https://github.com/pbering/xmc-demo-dotnethead used in this post has been updated to .NET 7.0, see ".NET 7.0 released, impact on .NET based head implementations for Sitecore XM Cloud".
During Symposium 2022 a few weeks back I felt inspired to explore how we can get a nice modern developer experience using .NET 6 and XM Cloud.
Most topics during Symposium was around using Next.js / Vercel and it seems that Sitecore is pretty excited about that and not giving .NET 6 much attention.
I believe in using the right tool for the job, but sometimes JavaScript/Node is not the right tool for your next head implementation. That could be for technical reasons or maybe coworkers and/or client teams are not able (or willing) to switch stacks.
Getting started
Go to https://deploy.sitecorecloud.io/ and create a new project and an environment named
dev.Clone boilerplate repo
git clone https://github.com/pbering/xmc-demo-dotnetheadinto some solution dir.Then authenticate, connect, push and publish items:
dotnet tool restore
dotnet sitecore cloud login
dotnet sitecore cloud project list
dotnet sitecore cloud environment list --project-id <INSERT PROJECT ID>
dotnet sitecore cloud environment connect --environment-id <INSERT ENVIRONMENT ID> --allow-write
dotnet sitecore ser push -n dev
dotnet sitecore publish -n dev
To get the edge token, download https://github.com/sitecorelabs/sxa-starter/blob/main/New-EdgeToken.ps1 into root and run it:
.\New-EdgeToken.ps1 -EnvironmentId <INSERT ENVIRONMENT ID>To get the jss editing secret, open "showconfig.aspx" and grab the value from the setting named
JavaScriptServices.ViewEngine.Http.JssEditingSecret,Add a new
appsettings.Development.jsonfile in the root:{ "Sitecore": { "ExperienceEdgeToken": "<INSERT YOUR EDGE TOKEN HERE>", "JssEditingSecret": "<INSERT JSS EDITING SECRET HERE>" } }That's it, run and you should see a site!
You can now get cracking on implementing more components or more advanced ones with custom logic. All while you enjoy fast build times, high request throughput, .NET Hot Reload, simply a much better and productive developer experience.
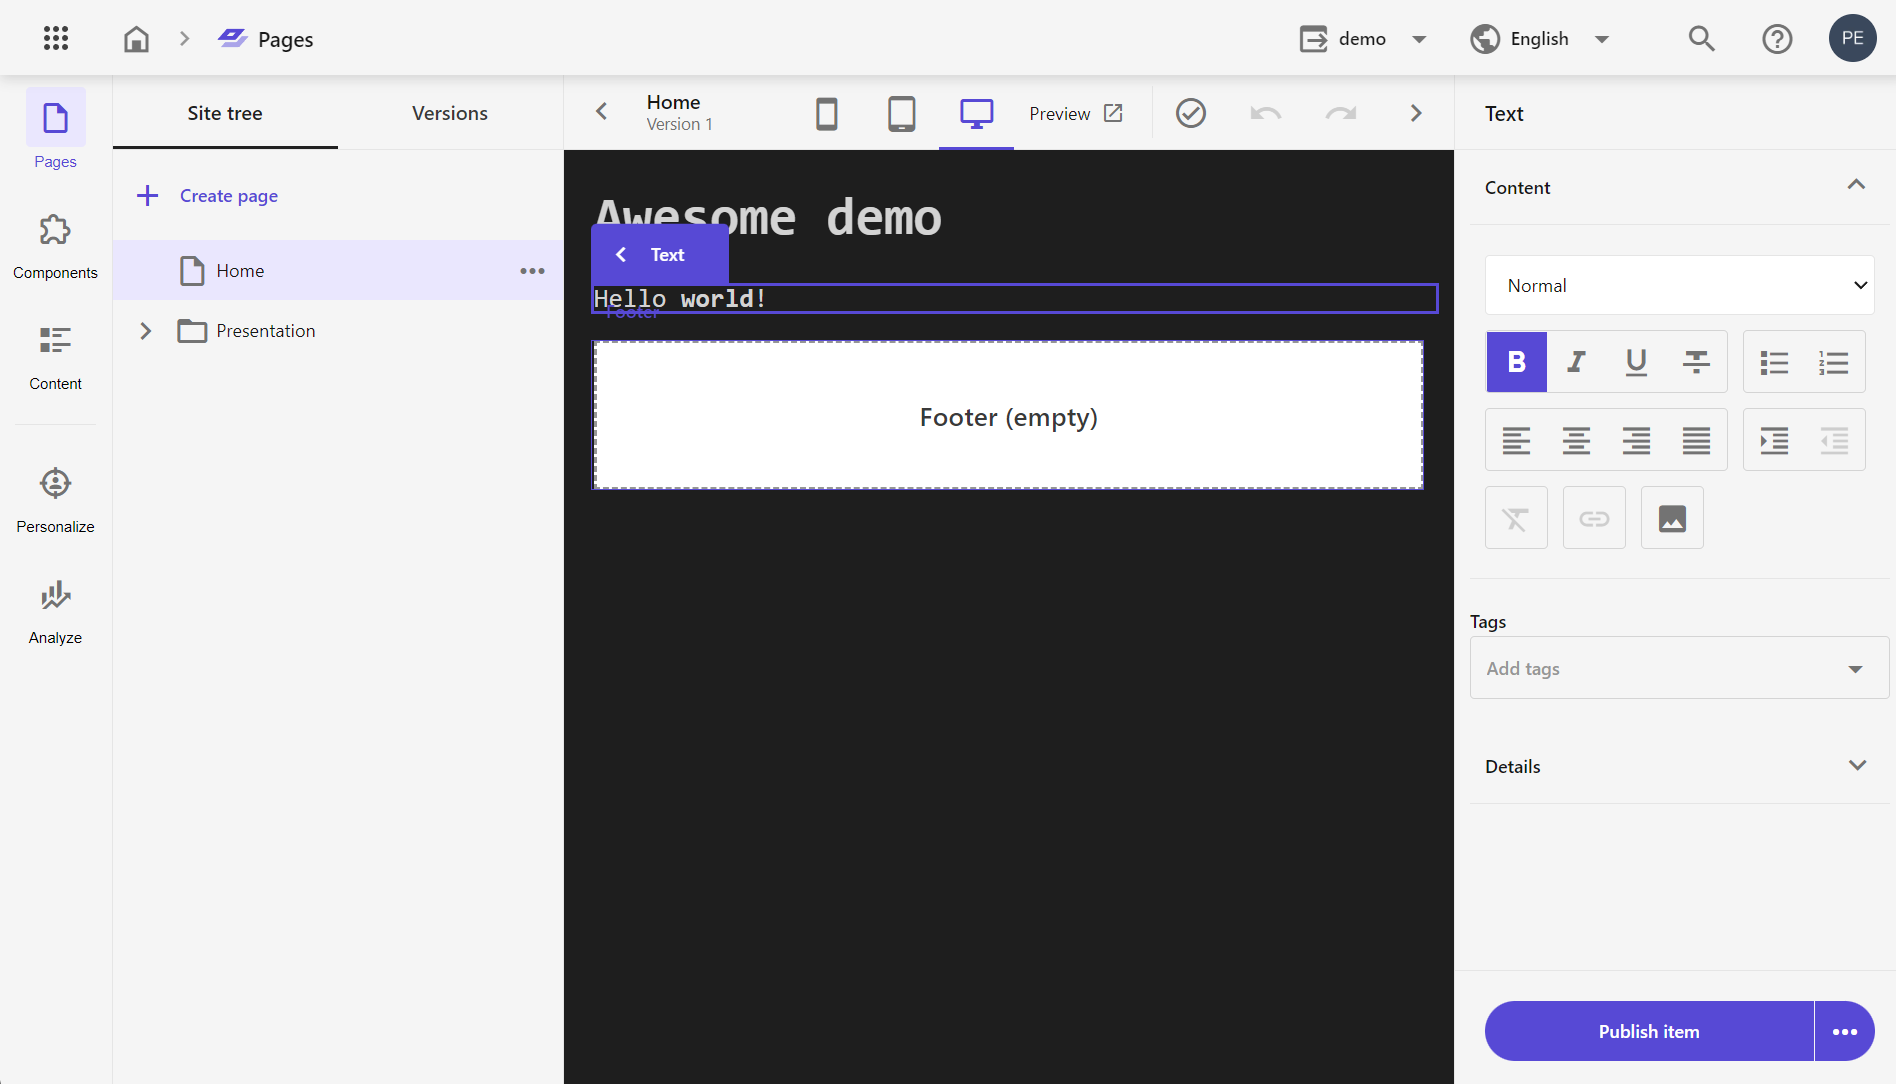
Use local rendering host as an editing host in XM Cloud
Let's up the game a bit and wire up our local .NET 6 head as an editing host to show the website running on localhost inside Sitecore Pages (and the classic Experience Editor) including ability to do inline editing!
Download https://ngrok.com/ and start with
ngrok http 5000(you can use any tunneling app that exposes local ports onto the internet)Copy the url from "Forwarding" shown, in my case https://171b-87-62-101-2.eu.ngrok.io/.
Open "items\demo-site\serialization\DemoSiteRendering\demo.yml" and update to this:
    Hint: ServerSideRenderingEngineApplicationUrl
    Value: "https://171b-87-62-101-2.eu.ngrok.io/"
    Hint: ServerSideRenderingEngineEndpointUrl
    Value: "https://171b-87-62-101-2.eu.ngrok.io:443/jss-render"
Run
dotnet sitecore ser push -n devWARNING: one would expect that updating these urls and pushing would just work, but I suspect that there is some bug in SXA, maybe cache (not the first time in history)... To make it work now, you have to open the classic Content Editor and navigate to
/sitecore/content/demo/demo/Settings/Site Grouping/demo. Then in thePredefined application rendering hostdropdown, select "Default", save and then select "demo" again and save.Open Sitecore Pages or the classic Experience Editor, and SUCCESS!
Beware of the SXA Navigation component
This one is tricky, the navigation component implementation used on XM Cloud is returning and array of fields where the Sitecore ASP.NET Rendering SDK expects an object which will make it fail on any page using that component.
To fix this add this class FixSxaHeadlessNavigationContentResolver to your XM Cloud repo, commit and push. When deployment is done, go into the Content Editor, navigate to /sitecore/system/Modules/Layout Service/Rendering Contents Resolvers/Headless Experience Accelerator/Navigation Contents Resolver and replace Type with yours.
Due to an issue in XM Cloud with IAR files (Items As Resources) and load order, you can't just overwrite the default
Typewith a serialized item. Module IAR files (including SXA) are currently being loaded AFTER your own, effectivity reverting whatever you are trying to do. Sitecore should fix this soon as they are aware of the problem, thankfully XM Cloud is SaaS so you will just get it at some point.
Closing
Hope this give you an idea of how to get started with XM Cloud and .NET 6 all without running XM locally which also means that you can do this on Linux or macOS.
I'm also impressed of how good the performance is, considering that the local .NET 6 head is getting remote data on every request from the "Experience Edge". On my machine (and internet connection) it can do 50.000 request with 1.000 concurrent connections in less than 10 seconds! That's an average of ~5000 req/sec, pretty impressive!
Posted 2022-11-03, tagged: sitecore, xmcloud, dotnet